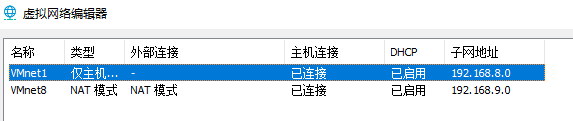
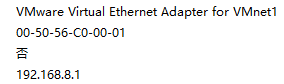
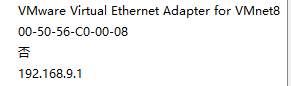
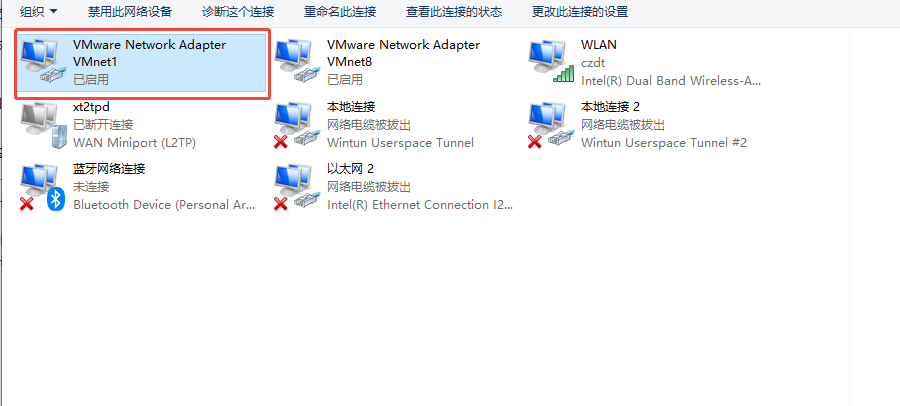
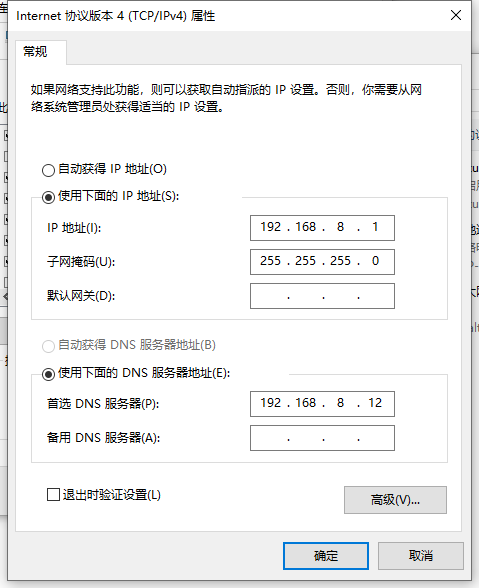
在vm虚拟网络编辑器 配置vmnet1与wmnet8
电脑端IP192.168.x.1 掩码24 无需网关配置
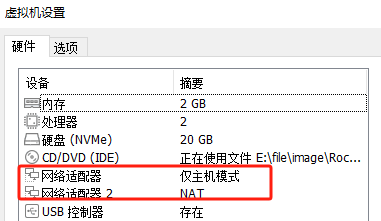
添加第二个网卡
删除网卡nmcli connection shownmcli connection delete ens160
添加网卡nmcli connection add type ethernet ifname eth0 con-name eth0nmcli connection add type ethernet ifname eth1 con-name eth1nmcli connection modify eth0 ipv4.method manual ipv4.addresses 192.168.8.3/24 autoconnect yes nmcli connection up eth0nmcli connection modify eth1 ipv4.method manual ipv4.addresses 192.168.9.3/24 ipv4.gateway 192.168.9.2 autoconnect yes nmcli connection up eth1echo "nameserver 192.168.9.2" >> /etc/resolv.confping baidu.com
使用脚本修改IP地址和主机名
~]# vim /usr/bin/sethost #!/bin/bash nmcli connection modify eth1 ipv4.method manual ipv4.addresses 192.168.99.$1/24 ipv4.gateway 192.168.99.2 autoconnect yes nmcli connection up eth1 nmcli connection modify eth0 ipv4.method manual ipv4.addresses 192.168.88.$1/24 autoconnect yes nmcli connection up eth0 hostnamectl set-hostname $2 echo "nameserver 192.168.99.2" >> /etc/resolv.conf ~]# chmod +x /usr/bin/sethost~]# sethost 3 acat /etc/sysconfig/network-scripts/ifcfg-eth0cat /etc/sysconfig/network-scripts/ifcfg-eth1
1
2
3
~]# vim /etc/selinux/config SELINUX =permissiveremove firewalld
克隆三台虚拟机sethost 10 nginxsethost 11 tomcatsethost 12 dns
配置tomcat
从课件材料中把tomcat上传到tomcat01机器上 apache-tomcat-8.0.30.tar.gz (tmp路径下)
1
2
3
4
5
6
7
8
9
10
yum -y install java-1.8.0-openjdk \\安装jdk
1
2
3
~]# tar -xf apache-maven-3.6.3-bin.tar.gz ~]# mv apache-maven-3.6.3 /usr/local/maven
安装Java依赖~]# yum -y install java-devel
1 2 3 4 5 6 7 ~]<mirror> <id> nexus-aliyun</id> <mirrorOf> * </mirrorOf> <name> Nexus aliyun</name> <url> http://maven.aliyun.com/nexus/content/groups/public</url> </mirror>
1 2 ~]# /usr/local/maven/bin/mvn -v Apache Maven 3 .6 .3
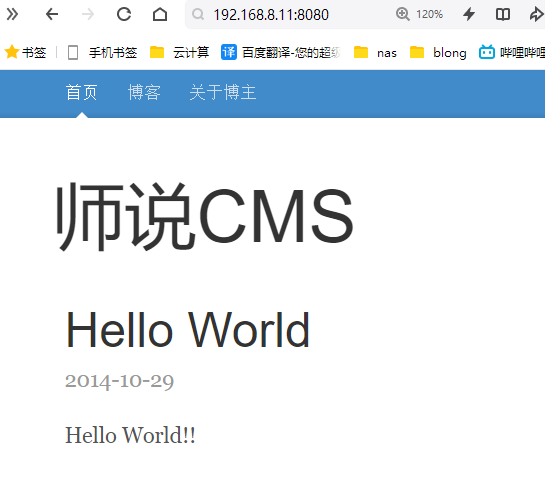
tomcat部署师说CMS项目
1 2 3 4 ~]xml README .md shishuocms.properties sql src webdefault.xml
通过maven把CMS编译打包
1
2
3
4
5
6
7
8
9
10
~]# cd CMS/INFO ] Executed tasksINFO ] ------------------------------------------------------------------------INFO ] BUILD SUCCESSINFO ] ------------------------------------------------------------------------INFO ] Total time: 01:20 minINFO ] Finished at: 2025-02-25T22:17:03-05:00INFO ] ------------------------------------------------------------------------
检查是否生成目录:target
1 2 3 4 5 CMS]xml README .md shishuocms.properties sql src target webdefault.xml CMS ]2.0 .1 shishuocms-2.0 .1 .war
将shishuocms-2.0.1.war拷贝到tomcat的webapps目录中
1 2 3 4 5 target ]# /root/apache-tomcat-8 .0 .30 /bin/shutdown.shtarget ]# rm -rf /root/apache-tomcat-8 .0 .30 /webapps/ROOTtarget ]# cp shishuocms-2 .0 .1 .war /root/apache-tomcat-8 .0 .30 /webapps/ROOT.war
启动tomcat
1 target ]# /root/apache-tomcat-8 .0 .30 /bin/startup.sh
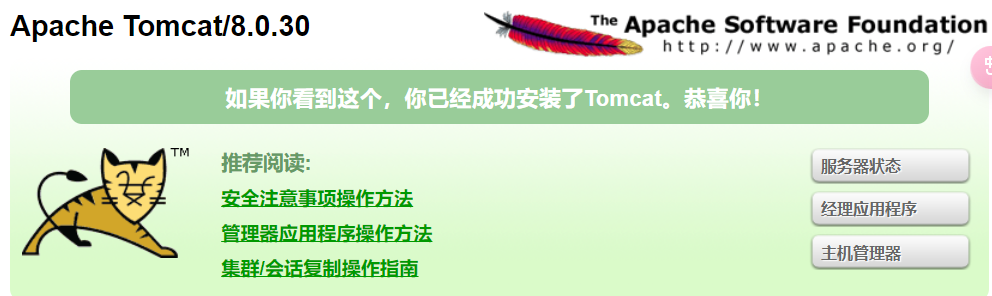
验证tomcat启动是否成功
1
2
3
target ]# ss -antlup | grep 8080 tcp LISTEN 0 100 *:8080 *:* users:(("java" ,pid=25168 ,fd=50 ))
查看CMS中的数据库配置文件
1
2
3
4
5
6
7
8
9
10
11
12
13
CMS]# vim src/main/resources/shishuocms.propertiesadmin =shishuocmsstorage =acedriverClass =com.mysql.jdbc.Driverurl =jdbc:mysql://127.0.0.1:3306/shishuocms?useUnicode=true&characterEncoding=UTF-8&zeroDateTimeBehavior=convertToNullusername =rootpassword =12345678initialPoolSize =2minPoolSize =2maxPoolSize =5
安装数据库
1
2
3
~]# yum install -y mariadb-server ~]# systemctl start mariadb ~]# systemctl enable mariadb
把CMS中sql目录的install.sql导入到数据库中
1 CMS ]# mysql < sql/install.sql
给root账号设置密码:12345678
1 2 3 CMS]# mysqladmin password #修改数据库密码 New password: #接下来输入12345678 new password: #在输入一次12345678
进入数据库中去查看CMS系统的登录密码
1
2
3
4
5
6
7
8
9
10
11
12
13
14
15
16
17
18
19
20
21
22
23
24
25
26
27
28
29
30
31
32
CMS] Database | information_schema | mysql | performance_schema | shishuocms | Tables_in_shishuocms | admin | admin_folder | article | comment | config | folder | guestbook | headline | media | user |* from admin; adminId | name | password | createTime | 1 | shishuocms | 6158f875bf826e15923779855b6eef2e | 2012-08-08 00:00:00 |
使用123456明文加密后的密码去修改密码
1
2
3
4
5
6
7
8
[shishuocms]> update admin set password='e10adc3949ba59abbe56e057f20f883e' where adminId=1; MariaDB [shishuocms]> select * from admin; +---------+ ------------+----------------------------------+ ---------------------+| adminId | name | password | createTime | +---------+------------+----------------------------------+---------------------+ | 1 | shishuocms | e10adc3949ba59abbe56e057f20f883e | 2012-08-08 00:00:00 | +---------+------------+----------------------------------+---------------------+
使用123456去登录
部署nginx (192.168.8.10)
1
2
3
4
5
6
7
8
[root@nginx ~]-1.22 .1 ]-1.22 .1 ]-1.22 .1 ]-1.22 .1 ]
启动nginx和验证安装是否成功
1
2
3
4
5
6
7
8
9
10
11
12
13
14
15
16
17
18
19
20
21
22
23
24
25
26
27
28
29
[root@nginx sbin]# /usr/local/nginx/sbin/nginx<!DOCTYPE html > <html > <head > <title > Welcome to nginx!</title > <style > html { color-scheme : light dark; }body { width : 35em ; margin : 0 auto;font-family : Tahoma, Verdana, Arial, sans-serif; }</style > </head > <body > <h1 > Welcome to nginx!</h1 > <p > If you see this page, the nginx web server is successfully installed and</p > <p > For online documentation and support please refer to<a href ="http://nginx.org/" > nginx.org</a > .<br /> <a href ="http://nginx.com/" > nginx.com</a > .</p > <p > <em > Thank you for using nginx.</em > </p > </body > </html >
配置nginx反向代理到tomcat
1
2
3
4
5
6
7
8
9
10
11
12
13
[root@nginx ~]# vim /usr/local /nginx/conf/nginx.confserver 192.168 .88 .11 :8080 ;server {listen 80 ;location / {
重新加载nginx配置[root@nginx nginx]# /usr/local/nginx/sbin/nginx -s reload
1 2 3 4 5 6 7 8 9 10 11 12 13 14 15 [root@nginx nginx]@nginx ~]192.168 .8.11 :8080 ;listen 80 ;// tomcats;@nginx nginx]
修改Windows hosts文件
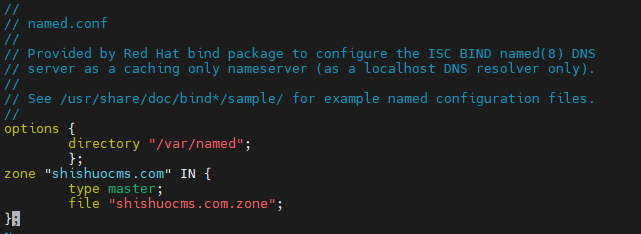
DNS服务器搭建(192.168.8.12)~]# sethost 40 dns[root@nds ~]# yum -y install bind bind-chroot
1
2
3
4
5
6
7
8
options {"/var/named" "shishuocms.com" IN {"shishuocms.com.zone"
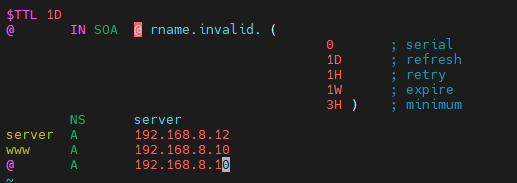
1
2
3
4
5
6
7
8
9
10
11
$TTL 1 DIN SOA @ rname.invalid. (0 1 D 1 H 1 W 3 H ) NS serverA 192.168.8.12 A 192.168.8.10 A 192.168.8.10
1
2
systemctl start named named
nginx配置修改(192.168.8.10)
1
2
3
4
5
6
7
8
9
10
11
12
13
14
15
16
17
18
19
[root@nginx ~]# vim /usr/local /nginx/conf/nginx.confinclude mime.types ;server 192.168 .8 .11 :8080 ;server {listen 80 ;location / {local /nginx/sbin/nginx -s reload
在windows中添加dns配置
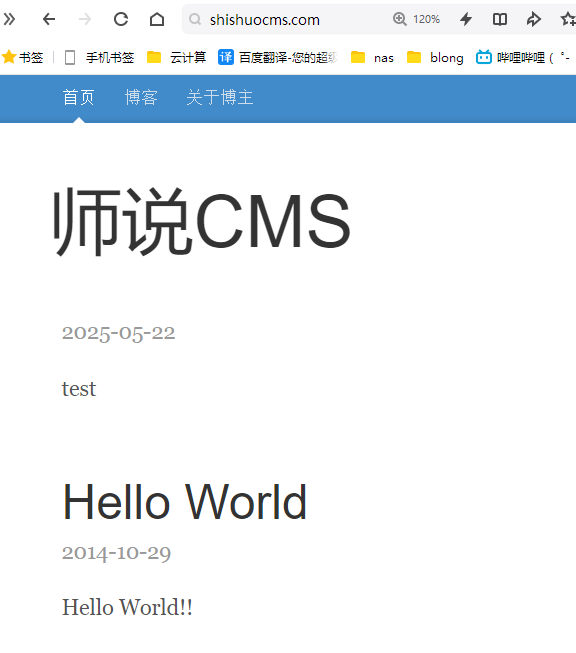
浏览器访问 (http协议)